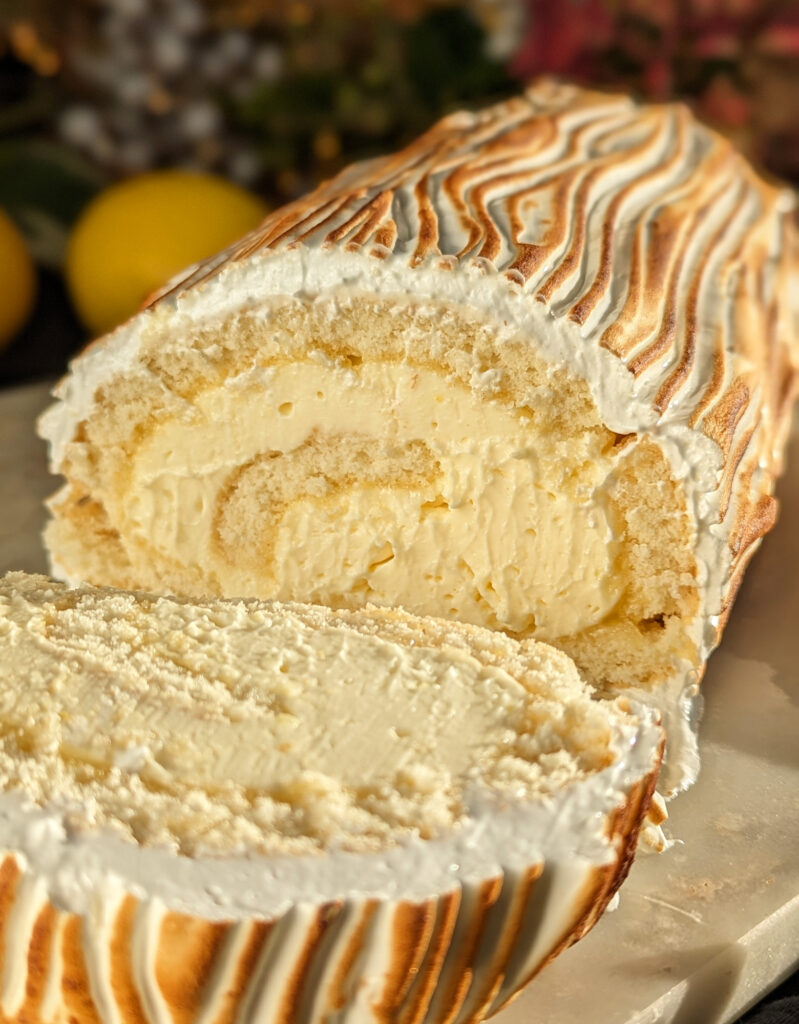
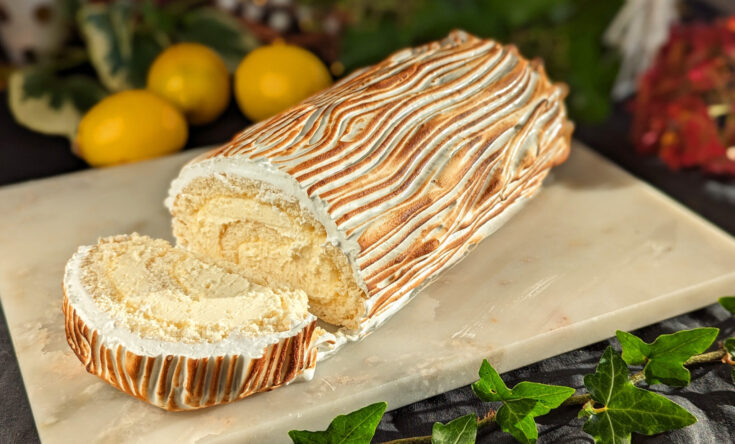
Due to popular demand, I have worked up a recipe for the gluten free lemon meringue yule log I recently baked. It was such a compliment to have so many people ask for the recipe – I hope you all enjoy making this at home for Christmas. Soft gluten free sponge swirled with lemon curd and lemon mascarpone cream, then covered with sweet Italian meringue. It’s a real show stopper!
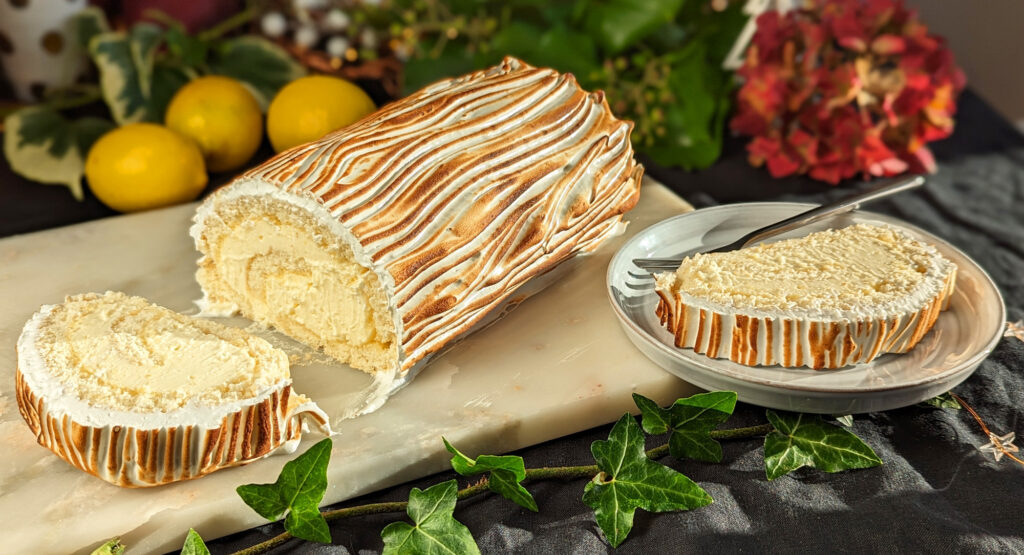
This lemony pud works really well in balancing the sweetness of the Italian meringue frosting with a tart lemon mascarpone cream centre and soft gluten free sponge. It’s a lovely dessert to eat, with the flavours and textures melding really beautifully.
You will need a blow torch to create the bark effect, but they are a great piece of kitchen equipment to have (from creme brulee to very speedy cheese on toast!) and can be got hold of cheaply in cook stores or online.
This dessert is a proper showstopper and would be a brilliant addition to your Christmas dinner table. However if you prefer a classic chocolate yule log, try my salted caramel gluten free yule log recipe! That recipe is also much less technical.
Can I Make This Lemon Meringue Yule Log Dairy Free?
This is a question I get asked on most of my recipes, and while I’ve not tried and tested a dairy free version I think it’d be lovely. The meringue and sponge are naturally dairy free.
Lemon curd is very easily adapted – you can make your own using this recipe, subbing in a plant based butter. Then for the filling you could use a dairy free cream cheese to replace the mascarpone, or try a whipped plant based cream filling instead.
Gluten Free Lemon Meringue Yule Log Recipe
This recipe will serve 6-8 people, depending on how generous you are with your slices!
You will find step by step photos underneath the recipe, in case you need a visual guide. For any other help along the way or if you have questions, please do message me on social media (@myglutenfreeguide) or email me at laura@mygfguide.com.
If you enjoy this gluten free lemon meringue yule log recipe, please leave a review on the recipe card below and spread the word! It makes a world of difference to me :).
Thank you so much! Laura xxx
Lemon Meringue Yule Log (GF)
A lovely lemony yule log, with soft gluten free sponge swirled with lemon curd and lemony mascarpone cream, coated in bruleed Italian meringue. A true festive show stopper!
Ingredients
For the sponge
- 125g (4,5oz) plain gluten free flour (I used FREEE by Dove's Farm)/all purpose gluten free flour
- 125g (4.5 oz) golden caster sugar (regular caster sugar also fine)/superfine sugar
- 3 medium eggs
For the filling
- A jar of good quality lemon curd (approx 320g (11 floz) I used Tesco Finest Lemon Curd)
- 150ml (5 floz) double cream/heavy cream
- 60g (2.5oz) golden caster sugar/superfine sugar
- 250g (8.8oz) mascarpone
- Zest of one lemon
For the frosting
- Three medium egg whites
- 160g (5.5oz) caster sugar
- 80ml (2.8 floz) water
Instructions
Making the sponge
- Preheat your oven to 180C/350F (fan) and line a medium-sized baking tray (approx 20-25 x 30-35cm/ 8 x 12 inches) with greaseproof paper or non-stick baking paper.
- Crack the eggs into a large bowl and add the sugar. Using an electric whisk, beat the eggs and sugar for 5-8 minutes until the mixture has increased in volume and turned a creamy pale colour. The mixture should be quite thick, so that if you run a fork through it a trail will be left behind.
- Sift the flour over the mixture and carefully fold in. You should do this slowly to preserve as many of the air bubbles in the mixture as possible. Fold until everything is perfectly combined.
- Tip the sponge mixture onto your lined baking tray and gently spread the mix to the edges using a palette knife.
- Now bake in the oven for 8-9 minutes, until the sponge has risen slightly and turned a pale golden colour. It will feel slightly springy to touch. You want it to be just baked, as overbaking can cause cracking when you roll it.
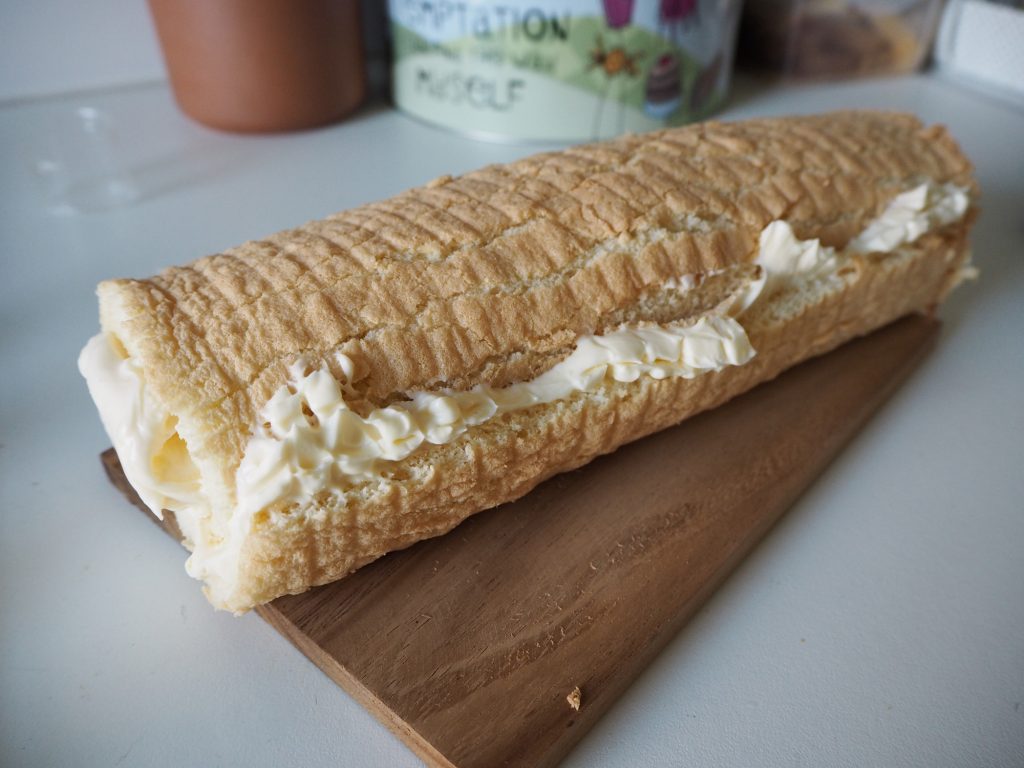
- Set the sponge aside for 2 minutes to cool slightly, then flip out onto a fresh piece of greaseproof paper before gently peeling off the greaseproof paper you used for baking. Carefully roll the sponge (from the short edge) with the greaseproof paper being rolled into the log too - do not squash it too much, just gently roll so that the sponge gets used to the spiral shape. This avoids too much cracking when you come to assemble your roll. Leave to cool completely (still rolled).
Filling your lemon meringue yule log
- Once the sponge has cooled, carefully unroll it and spread 60g (2.8oz) of lemon curd thinly over the interior side of the sponge (the side that will be the centre of the roll). If you do get any cracking with the sponge, due to overbaking, don't fret, as you can easily patch it up. No one will know once the yule log is finished.
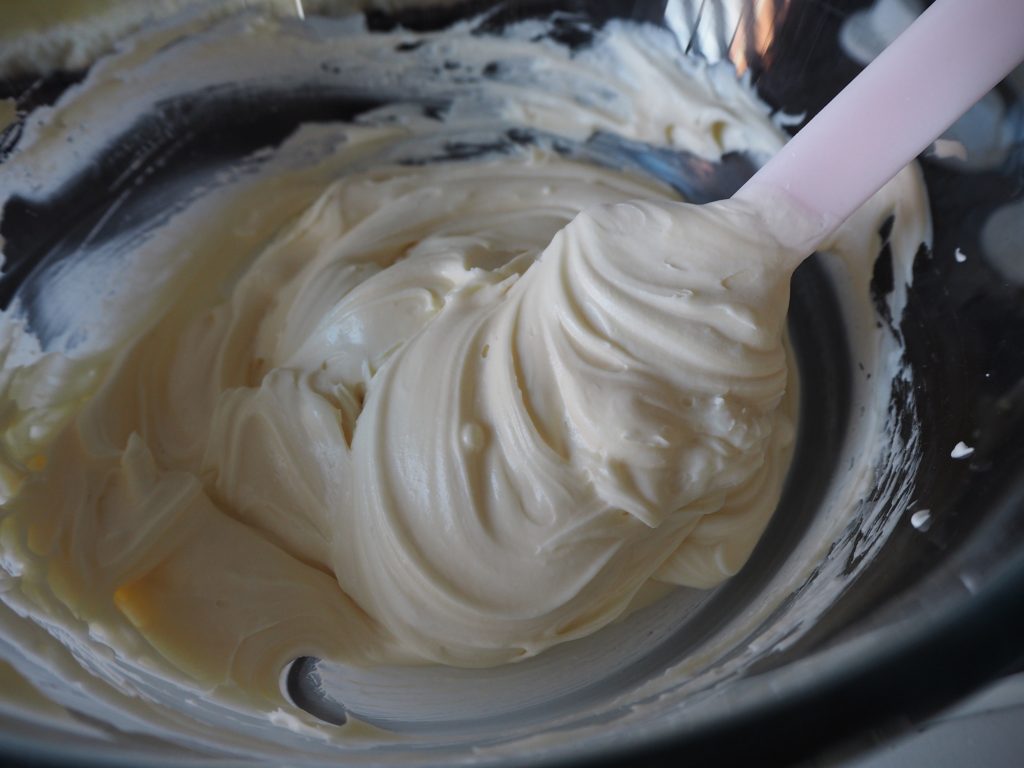
- Now we can make the mascarpone filling. In a large bowl, whisk mascarpone, caster sugar, 260g (9oz) lemon curd and the lemon zest until smooth. Add double cream and whisk until thick (this takes a minute or so - careful not to overwhisk or you will end up with a butter texture).
- Using a palette knife, spread the cream over the lemon curd-topped sponge. Ensure the layer is nice and even.
- Carefully roll the sponge (with cream/lemon side facing inwards) again, this time keeping the greaseproof paper outside and using it to ease the sponge into a yule log shape. Use your fingers to get the first curve, then roll everything with very little pressure, ensuring you do not squidge the cream out. Remember we are rolling the short edge inwards, not the long edge. You should end up with a nice swirled roll, as pictured.
- When finished, roll it over slightly to place the outer edge of the sponge on the underside. This will help keep the yule log nicely rolled up and stop it from unfurling. Trim each end to even out and raggedly bits (you can eat the trimmings!).
Time to make the Italian meringue
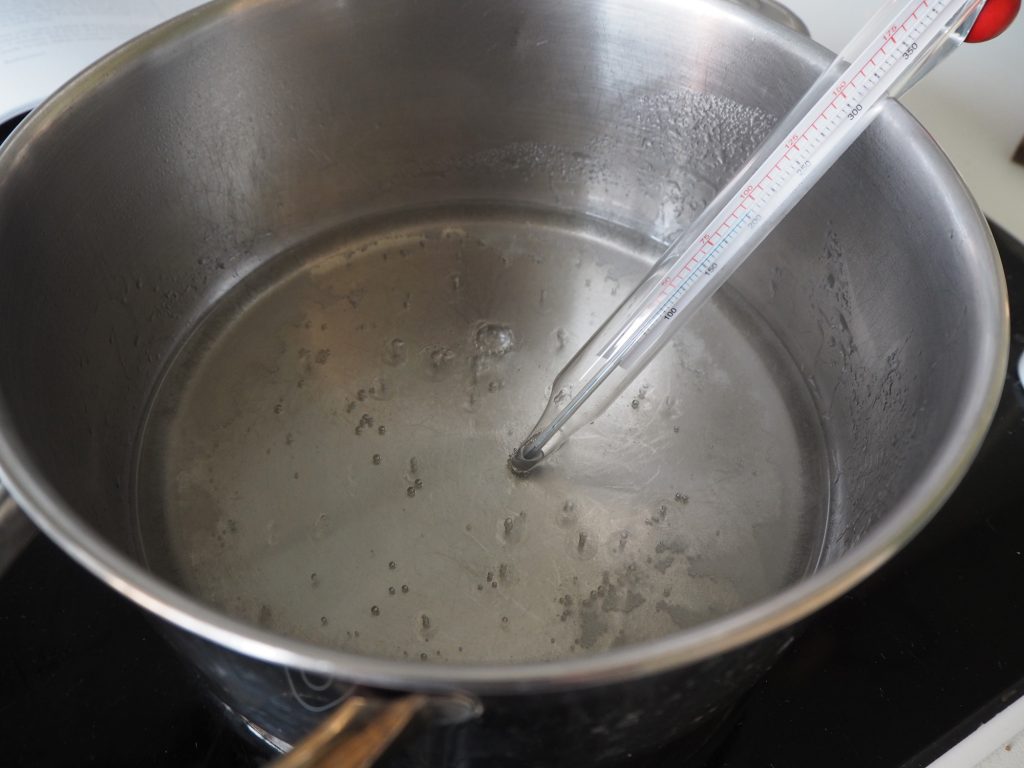
- This gluten free yule log is covered in Italian meringue, which can be a bit fussy to make but isn't as advanced as everyone makes out. You do need a sugar thermometer for this method though. If you do not have one, search Google for the alternative "soft ball" method.
- Take a small saucepan and place over a low heat. Add the sugar and water and swirl the pan to combine them. It is important that you do not use anything to stir the mixture, as this will introduce impurities and form sugar crystals rather than a nice smooth sugar syrup. Place your sugar thermometer in the syrup and allow it to heat up nice and slowly for the first 10 minutes (to ensure the sugar is well-dissolved). Then turn up to medium low to start heating it up. We want the sugar syrup to get to 118C, but in the meantime you can start preparing the egg whites.
- In a large bowl, use an electric whisk to beat the egg whites on a low speed. You need the egg white to become stiff peaks at around the same time as the sugar reaches 118C/244F, hence the low mixer speed.
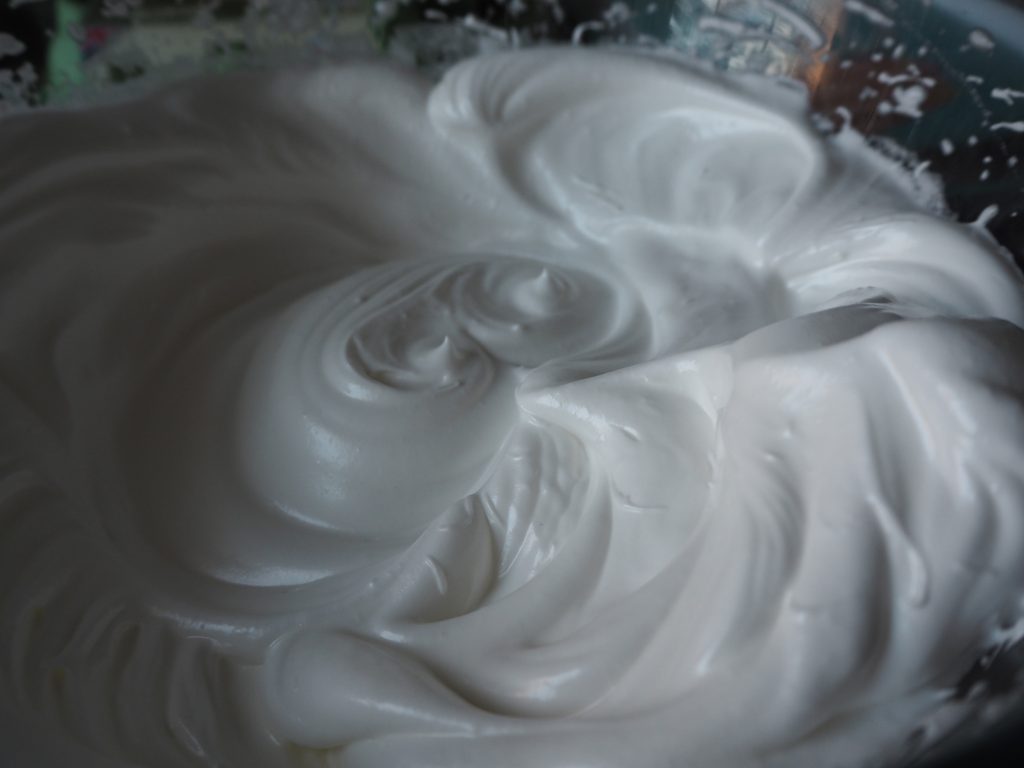
- As soon as the sugar is nearly at temperature, increase the whisk speed to high to bring your egg whites to the stiff peak stage. By stiff peak, I mean that when you lift the whisk out of the egg white mixture, soft peaks of egg white will be formed.
- Turn the whisk down to a medium speed and then gradually pour the hot sugar syrup into the centre of the egg whites, whisking constantly.
- Whisk the mixture for 5 minutes, allowing the egg whites to be cooked by the hot sugar. You will know the meringue is ready when it takes on a beautiful, glossy appearance.
The fun part!
- Blow torch at the ready...let's get to it!
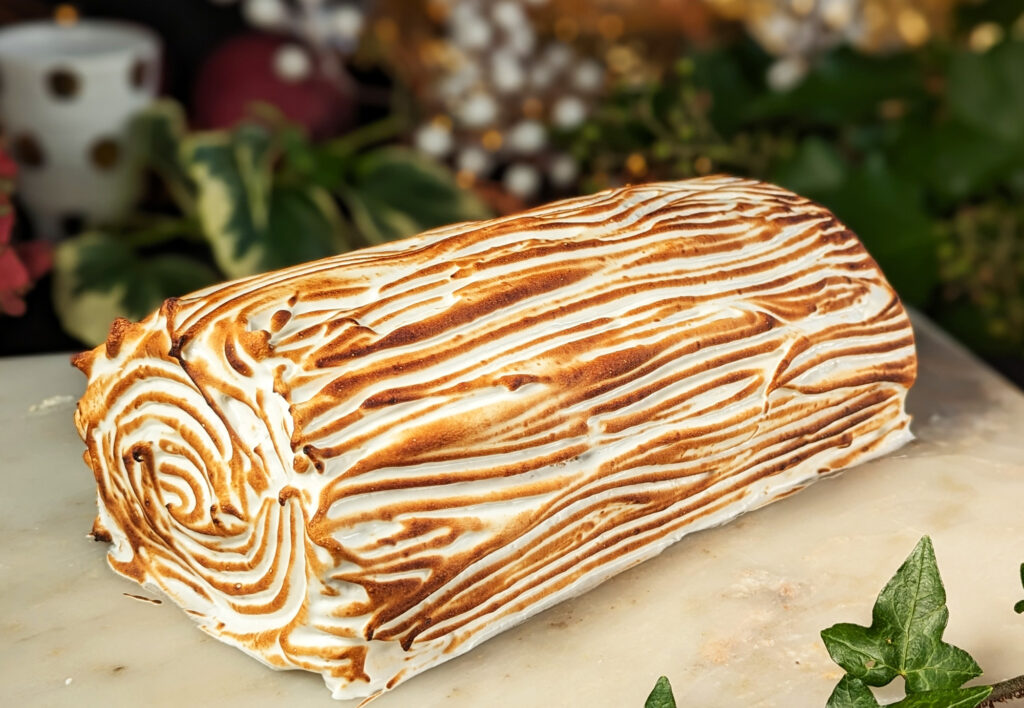
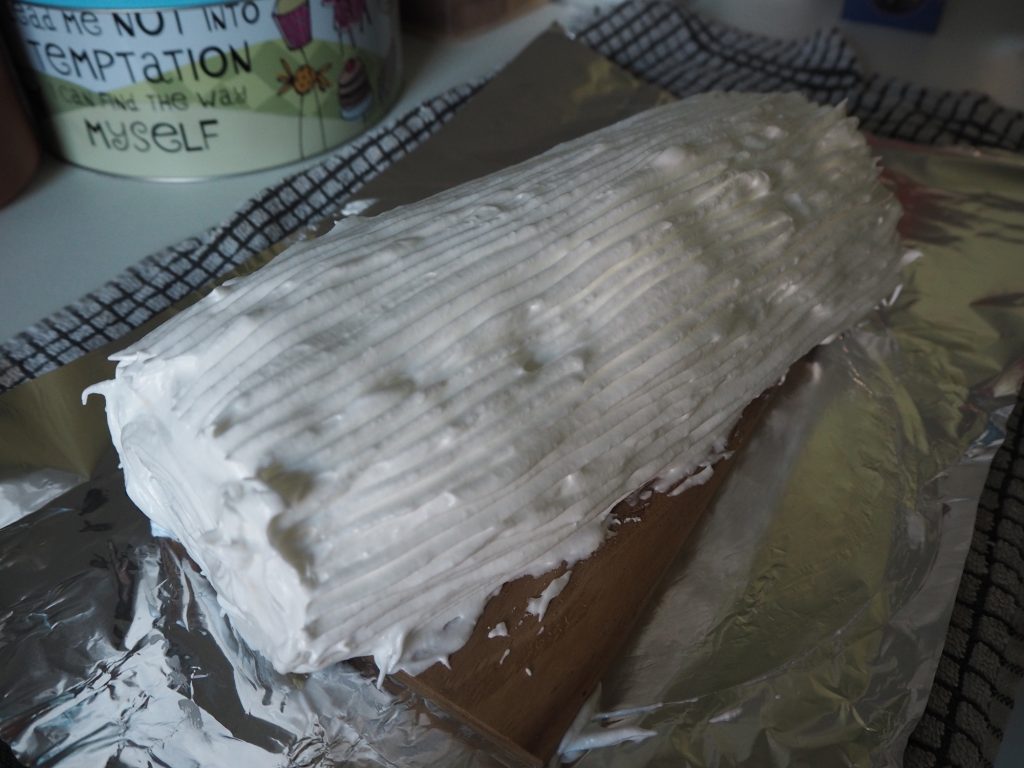
Place your sponge roll on a heatproof surface or an older chopping board you do not value (it may get slightly scorched while blowtorching). I also then place a damp tea towel and piece of tin foil underneath the board to protect my work surface. Better safe than sorry. No-one wants a melted kitchen. - Using a small palette knife, spread the Italian meringue all over the sponge yule log. You should cover every exposed part of the yule log, including the ends (don't worry about the underside). Smooth the edges down well, then ensure a fairly smooth coating over the main body of the log too.
- Run a fork lengthways through the meringue to create a bark effect. You might need to wash the fork prongs inbetween sweeps, if excess meringue builds up on them. Only light pressure is needed, as we want the fork to go about halfway into the meringue layer but not all the way through to the sponge.
- Now to make the exposed wood log ends, use a fork prong or a skewer to draw a spiral. This mimics the rings of a cut log.
- Finally, we can fire up that blow torch! On a low heat, gently run the blow torch back and forth along the meringue. The meringue ridges will brown quickly, giving you a brilliant bark effect. Remember to also brown the ends of the log. And there we have your gluten free lemon meringue yule log - quite the festive show stopper :).


Remember to tag me @myglutenfreeguide on Instagram or Facebook if you make this recipe, I can’t wait to see all your creations!
If you enjoyed this recipe why not try one of my other gluten free dessert recipes:
Happy baking! x