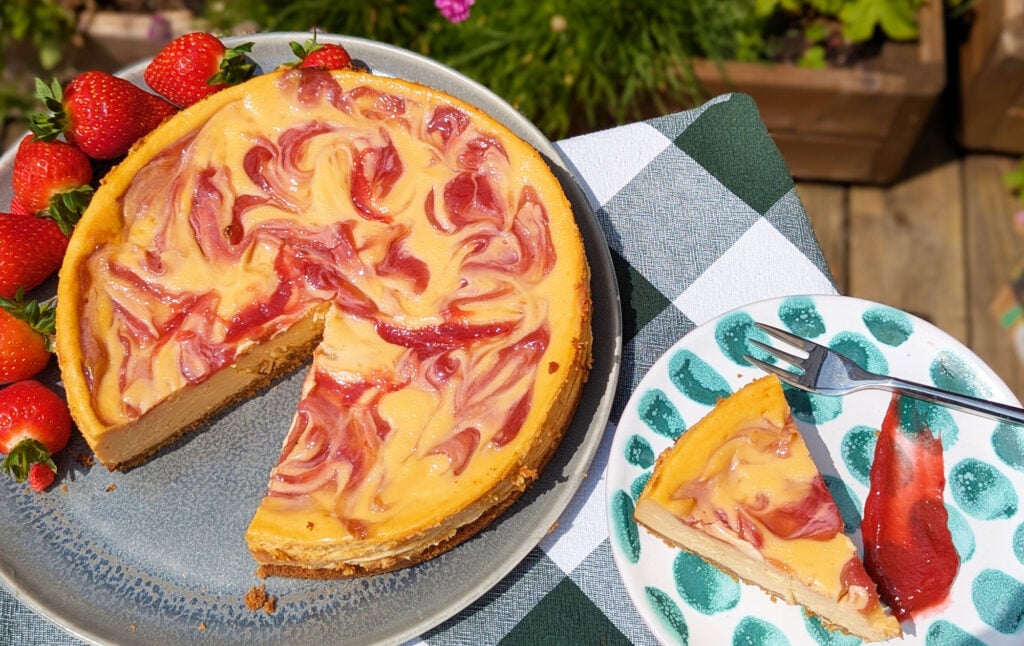
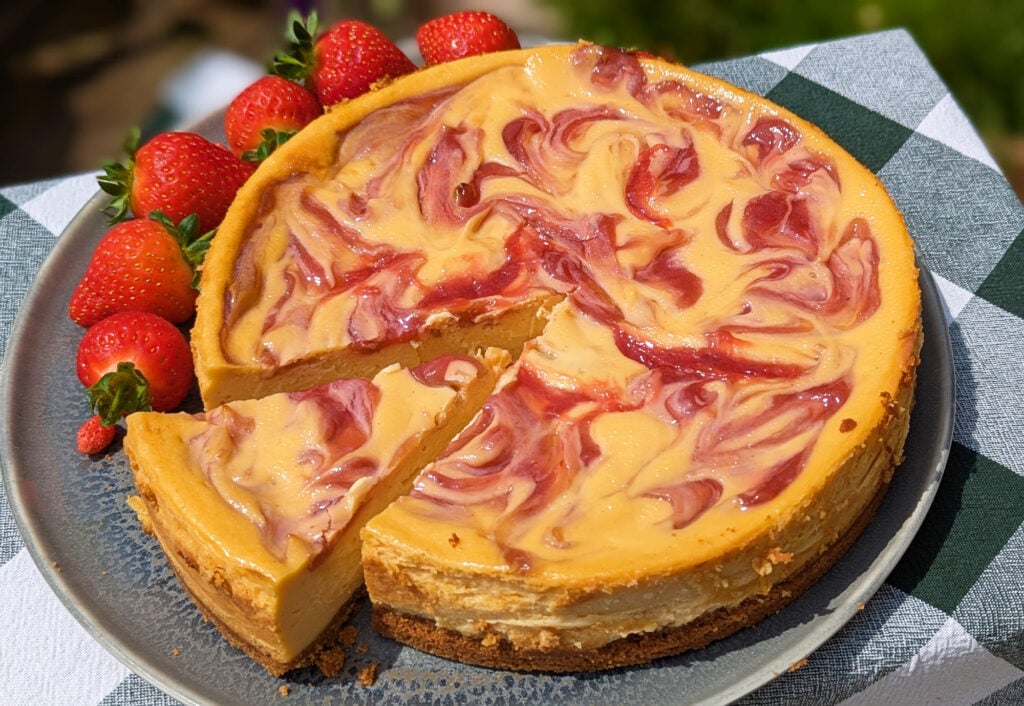
I am so delighted with how this rhubarb & custard gluten free baked cheesecake turned out, it is heaven on a plate!
Years ago this cheesecake flavour combination popped into my head, but I hadn’t gotten round to creating a recipe…until now. And I am so glad I did because the resulting dessert tastes even better than I had expected.
A gluten free digestive biscuit base, topped with creamy vanilla custard flavoured cheesecake swirled with real rhubarb puree. I’ve also allowed for extra rhubarb puree to serve on the side 1) because it tastes great and 2) you can make the plated slices look really fancy if you have guests.
If you have any unused rhubarb puree after making, enjoy it for breakfasts swirled through plain Greek yoghurt or skyr, topped with granola (try this recipe for a homemade variety).
If you are looking to learn more about gluten free baking, I’d recommend my cookbook as a starting point. It contains a tonne of delicious recipes, half baking and half meals. The baking sections start with nice easy recipes and help you gradually upskill as you progress through the book.
Find it here: Eat & Enjoy Gluten Free (Amazon review: “Without doubt this is the best gluten free (actually scrap that) .. this is the best recipe book I own!” Jen).

Can I Make This Baked Cheesecake in Advance?
Yes, you can make this rhubarb & custard gluten free baked cheesecake a day in advance, it is an excellent make-ahead dessert. Keep in the tin, cover with cling film and store in the fridge until needed.
What Should I Do with Any Leftovers?
If you miraculously have any leftover cheesecake, then you are one lucky duck! It will keep well in the fridge for a couple of days, either covered with cling film or stored in a tupperware.
Leftover cheesecake has to be one of life’s greatest small pleasures, so go on, treat yourself to a slice of rhubarb & custard gluten free baked cheesecake with your afternoon coffee!
I Can’t Get Hold of Custard Powder
No problem, you can switch it for cornflour plus an extra tsp vanilla bean paste. It won’t have quite the same custard flavour but will work beautifully.
Rhubarb & Custard Baked Cheesecake Recipe
Time for the recipe, which you’ll find below. This rhubarb and custard gluten free baked cheesecake will technically serve 10 people, but it’s so good I advise you ensure you have some leftovers to enjoy too :).
If you have questions, please do message me on social media (@myglutenfreeguide) or email me at laura@mygfguide.com. I’ll get back to you as soon as I can.
If you enjoy this rhubarb & custard gluten free baked cheesecake recipe, please leave a review on the recipe card below as positive reviews are immensely helpful.
Thank you! Laura x

Rhubarb & Custard Gluten Free Baked Cheesecake
An incredible rhubarb and custard gluten free baked cheesecake, with vanilla custard cheesecake base swirled with real rhubarb puree. Gorgeous!
Ingredients
For the rhubarb puree:
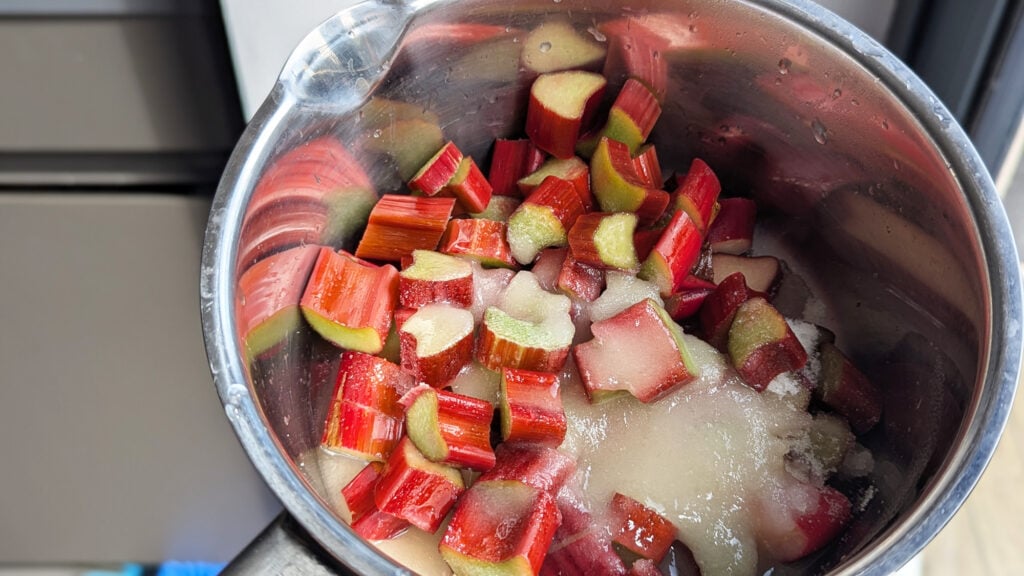
- 200g (7oz) rhubarb (the nice pink forced rhubarb works best, for a really vibrant coloured puree)
- 100g (3.5 oz) caster sugar
- Juice of 1 lemon
- 1 tsp cornflour
For the cheesecake base:
- 160g (5.5oz) gluten free digestive biscuits/graham crackers
- 1 tbsp light brown sugar
- 80g (2.8oz) unsalted butter
For the cheesecake filling:
- 720g (25 oz) full fat cream cheese (Philadelphia is my preferred variety)
- 100g (3.5oz) light brown sugar
- 100g (3.5oz) caster sugar
- 3 tbsp custard powder (I use Bird's)
- 2 tsp vanilla bean paste (or vanilla extract)
- 2 large eggs + 2 egg yolks
Instructions
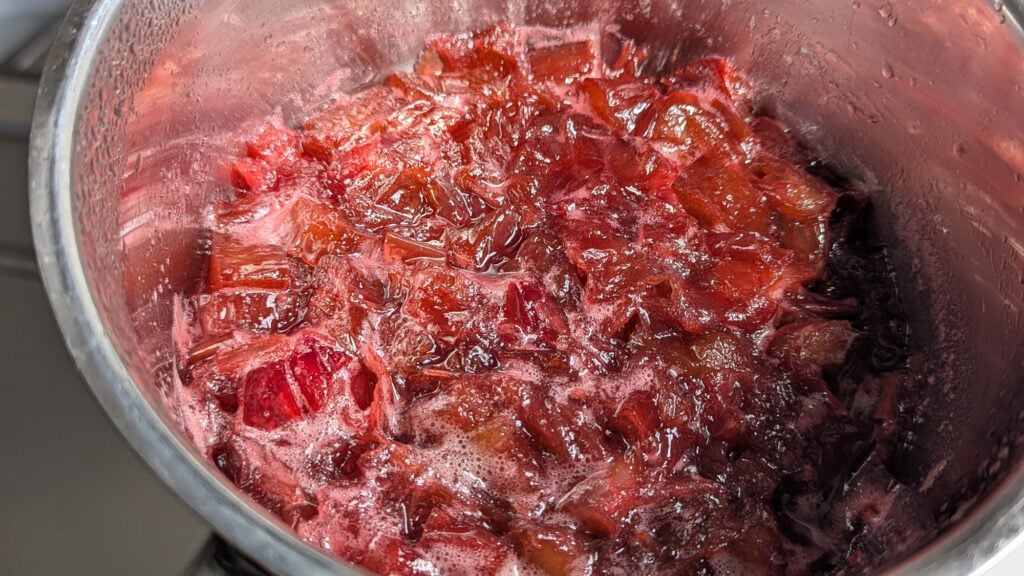
- Chop the rhubarb into small chunks and place in a small saucepan with the caster sugar and lemon juice. Bring to a boil, then simmer over a medium-low heat, stirring regularly, for about 15 minutes. Or until the rhubarb is nice and soft.
- Meanwhile, preheat your oven to 180C (fan). Line the base of a small, non-stick springform tin (20cm) with non-stick baking paper.
- Place the butter in a small bowl and melt it in the microwave (or use a pan over a low heat if you do not have a microwave). Meanwhile, blitz your gluten free biscuits in a small blender to turn them into fine crumbs.
- Add 1 tbsp of light brown sugar to the butter and then tip in the gluten free biscuit crumbs into the bowl with the butter and sugar. Stir everything well to ensure the ingredients are fully combined.
- Tip the biscuit mixture into the springform tin and press down with a fork until you have an even, well compacted biscuit base. Then bake for 10 minutes, before removing it from the oven and setting aside.
- Back to the rhubarb, which should be nice and soft now. Blitz it in a blender until the large chunks have broken down (doesn't need to be completely smooth).
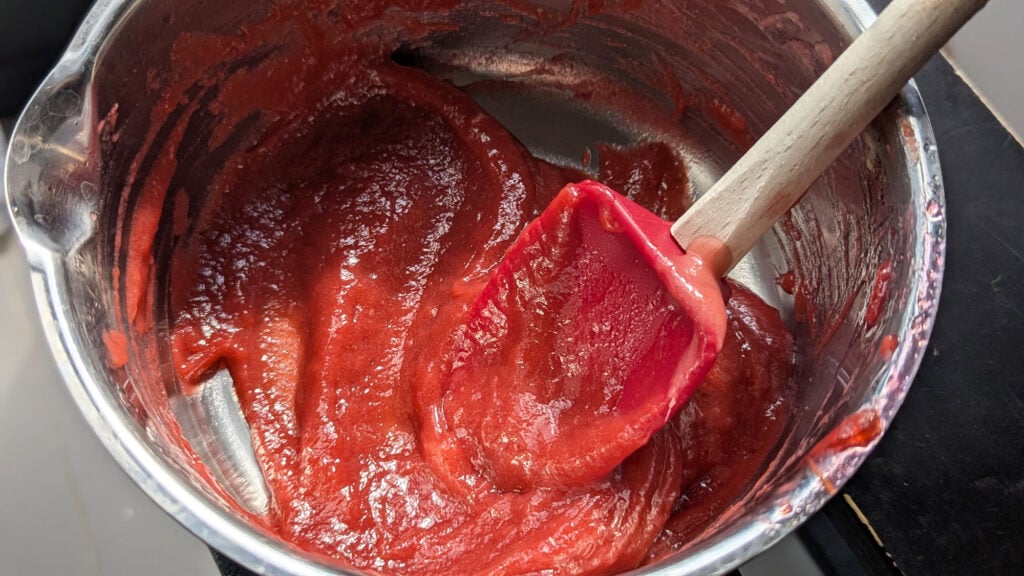
- Mix the cornflour with 2 tsp water to form a slurry. Then add to the pan with the rhubarb puree and stir to combine, heating for a couple of minutes (and stirring) to thicken it slightly. Then set aside to cool, placing the pan in a basin of cold water to speed this up.
- Now for the cheesecake filling! In a large bowl, stir the cream cheese with a spatula to remove any lumps and make it completely smooth in texture. Add the vanilla, light brown sugar and caster sugar to the cream cheese, then stir well to combine.
- In a small bowl mix the custard powder with a couple spoonfuls of cheesecake mixture, until you have a nice smooth paste, then incorporate it into the main bowl, stirring well to ensure you don't get any lumps.*
- Finally, add the two eggs and the two egg yolks, one at a time, to the bowl. Stirring the mixture as you add each one to ensure it stays smooth.
- Pour the cream cheese filling onto the biscuit base, then use a spatula to level it out and spread to the edges.
- Then spoon about half of the rhubarb puree onto the top of the cheesecake in blobs, before swirling through the top of the cheesecake with a fork.
- The cheesecake then goes back into the oven to bake. Bake at 180C (fan) for 10 minutes, then (keep the oven door closed) turn the temperature down to 110C (fan) and allow to bake for a further 40 minutes. After this time, turn the oven off completely but leave the cheesecake inside. Wedge the oven door open ever-so-slightly with a folded tea towel and leave the cheesecake inside to cool gradually for 2 hours (longer is fine too).
- Take the cheesecake out after the cooling time and you will see it is nicely set. If you have any small cracks, simply fill them in with some more rhubarb puree. Then use a small palette knife to gently loosen the edges of the cheesecake from the springform tin, then ease the tin open and slide your cheesecake onto a serving board. Remember to remove the baking paper from under the base – I use a spatula to gently ease my cheesecake off the paper and to slide it onto the board.
- Either chill in the fridge if serving later, or enjoy right away! Slice the cheesecake and serve with an extra spoonful of rhubarb puree on the side.
Notes
*If you get an lumps don't fret! A vigorous stir should smooth them out or, worst case scenario, pass the filling through a fine mesh sieve to remove them.
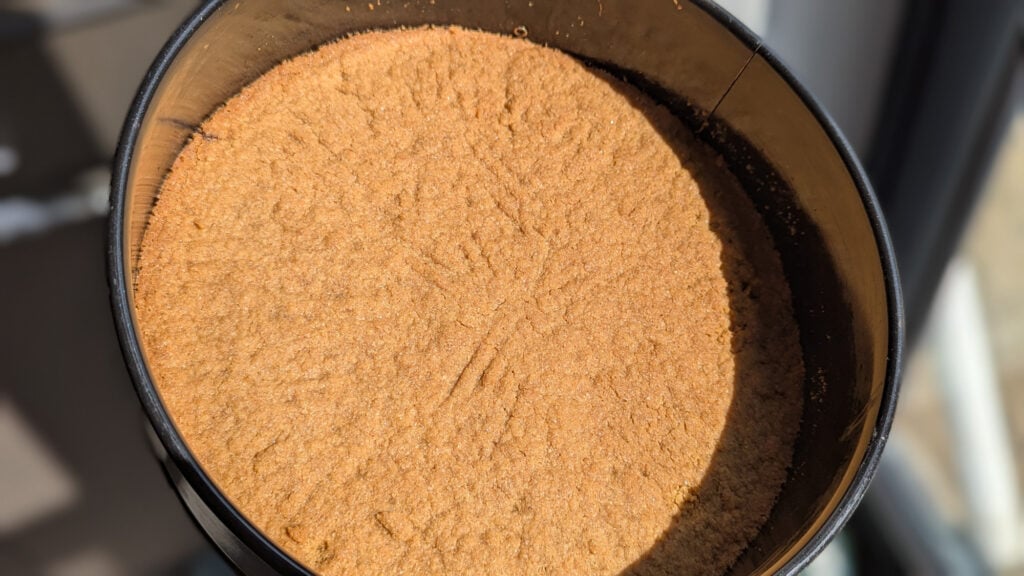
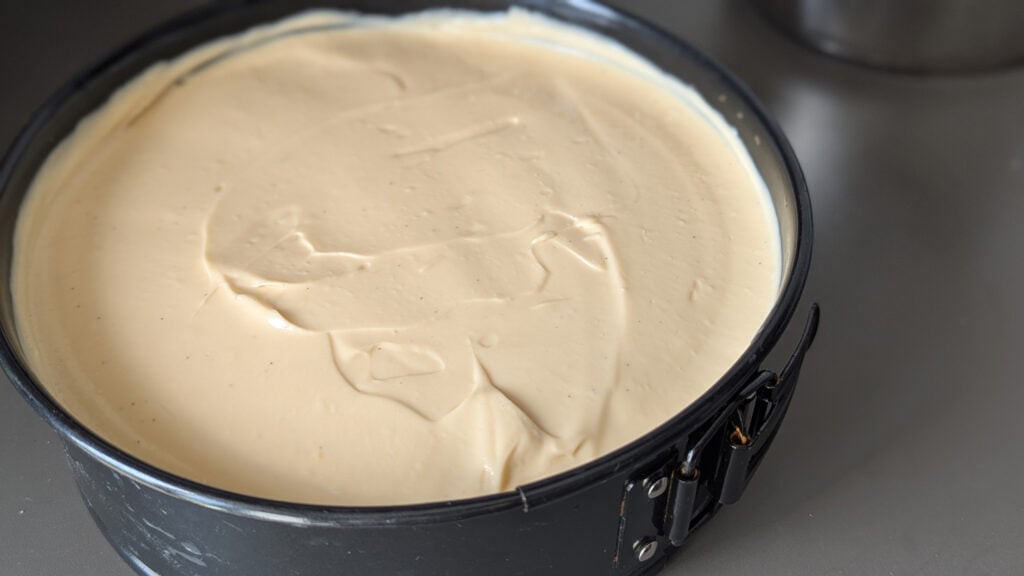
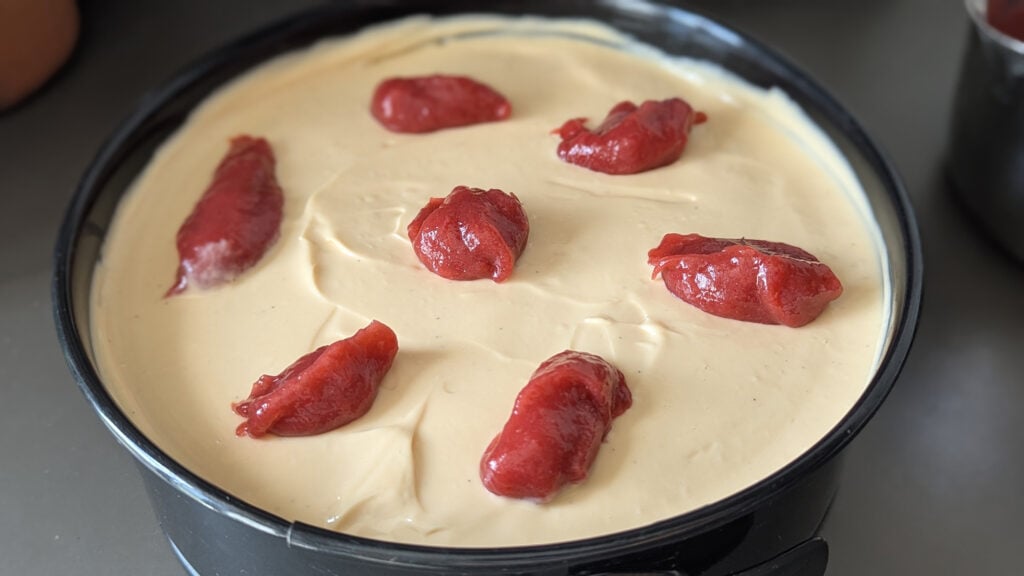
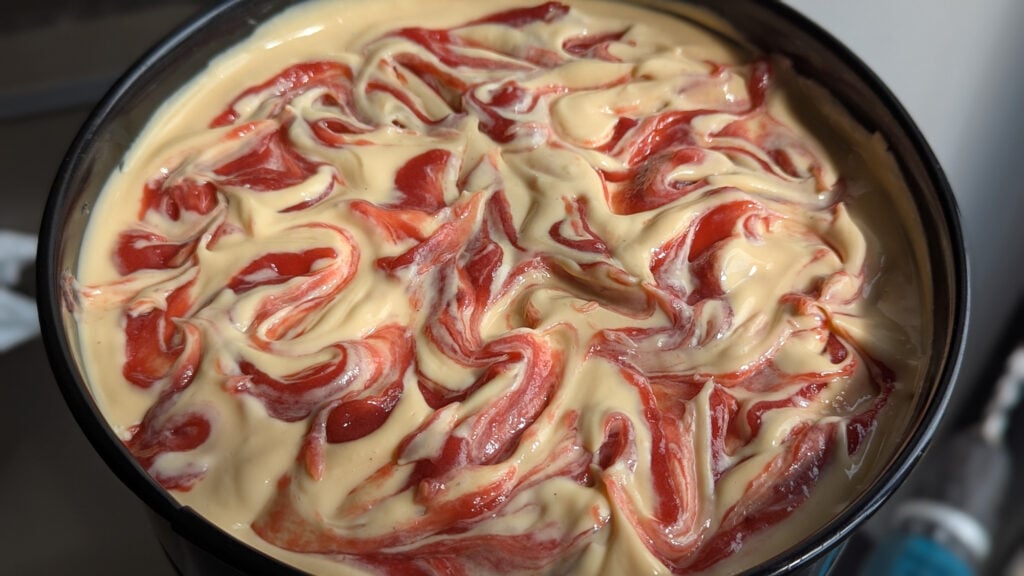

The images below should help guide you while making this recipe, showing you what the various stages should look like. If you have any other questions feel free to shoot me an email or DM me on Instagram.
I hope you enjoy this rhubarb and custard gluten free baked cheesecake! For more delicious bakes, why not try some of these recipes:
Happy baking! x