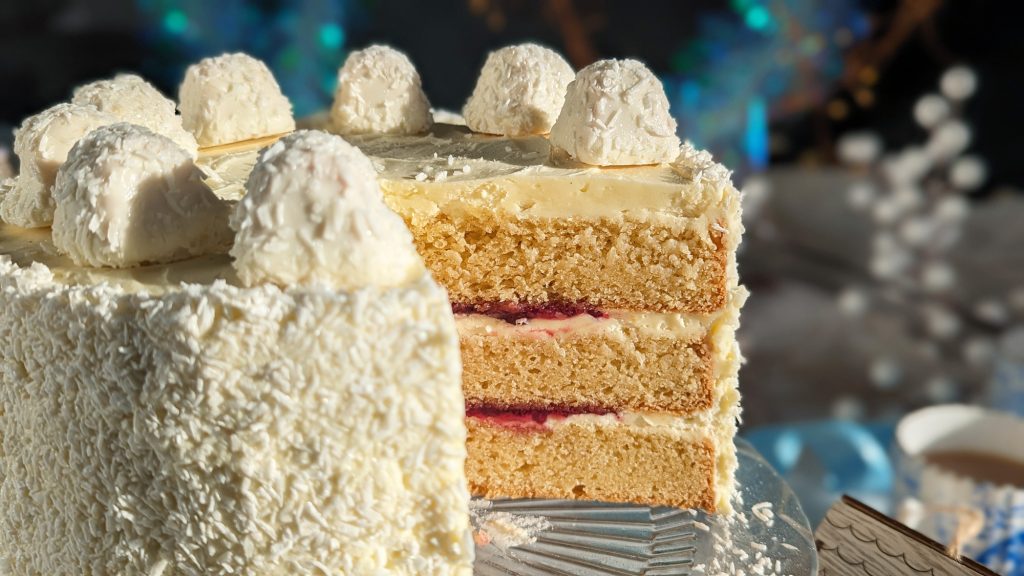
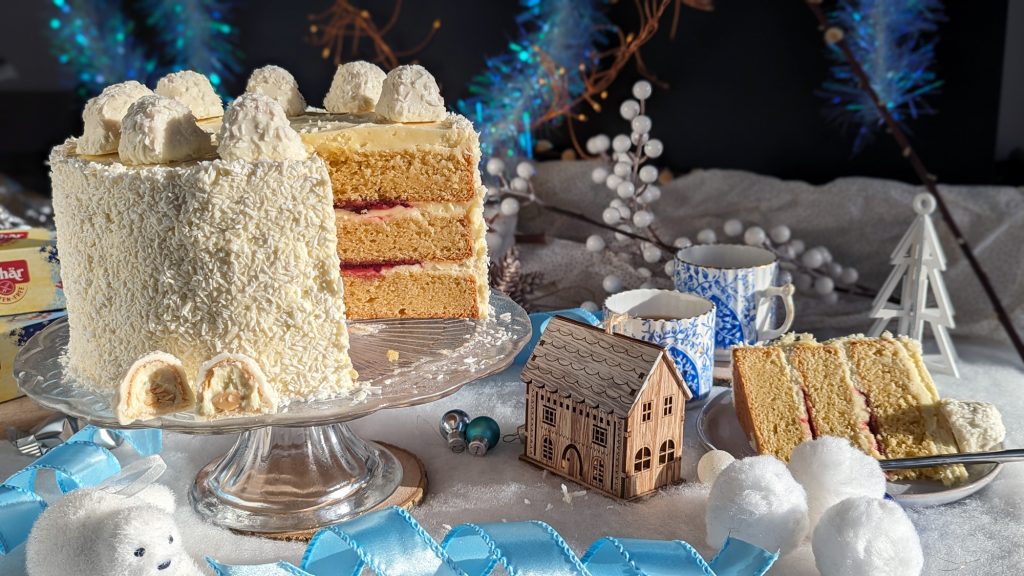
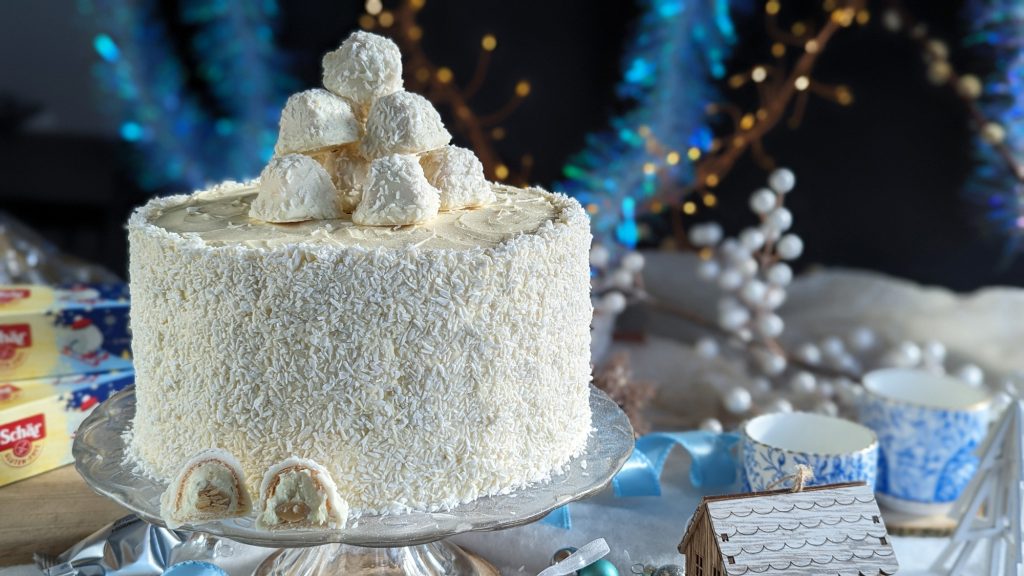
This gluten free snowball cake is a wonderful alternative to traditional British Christmas fruit cake and perfect for other winter celebrations and birthdays.

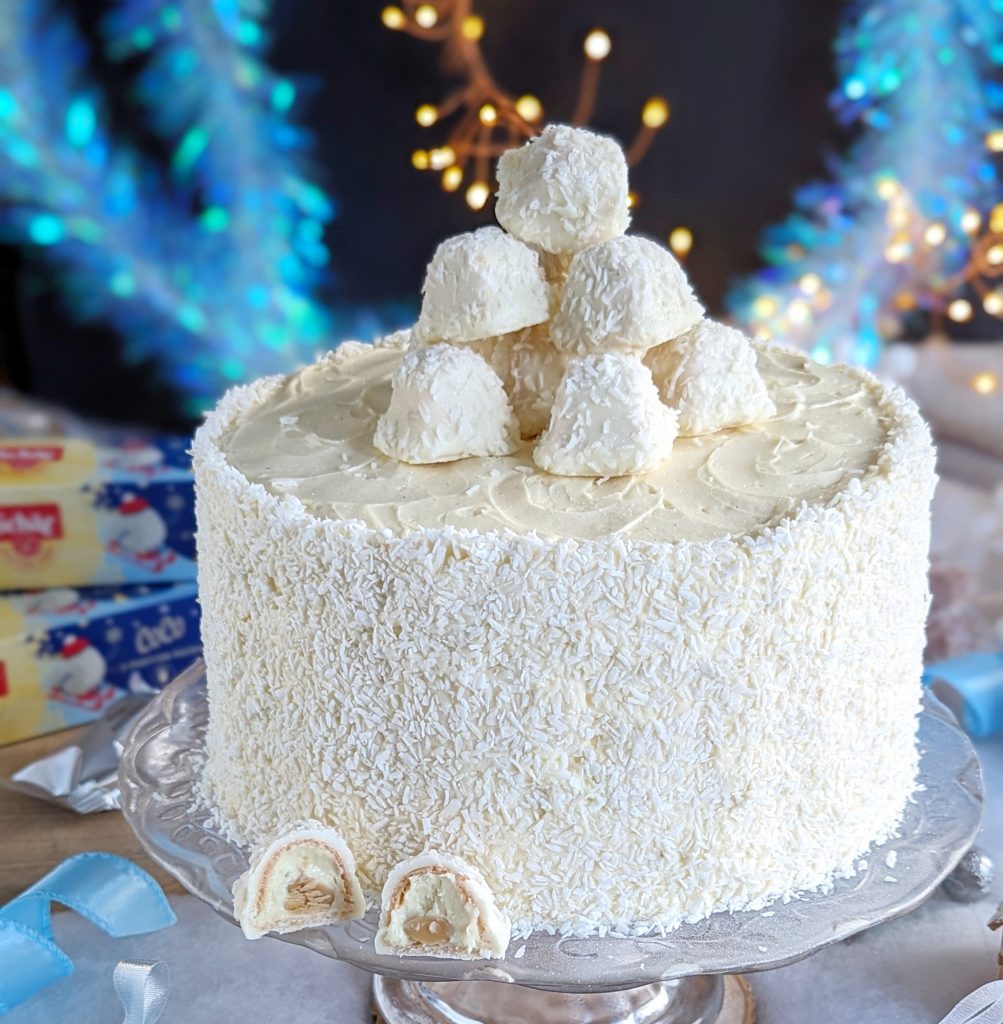
With layers of gluten free vanilla sponge, white chocolate buttercream and raspberry jam encased with more buttercream and a dusting of coconut. Such a delicious flavour combination!

I’m not a fan of traditional Christmas cake as I don’t like fruit cake (although if you are a traditionalist, you can find my gluten free Christmas cake recipe here), so this fluffy sponge cake is right up my street.

Is This Cake Tricky To Make?

As far as celebration cakes go, this is actually much easier to make than you would think. Using my really simple Victoria Sponge Cake recipe as the base, to give that fluffy sponge, which is a cake absolutely anyone can bake.

The white chocolate buttercream should be simple too, following my instructions below (adapted from a Sally’s Baking Addiction recipe). And if you’ve zero decorating skills do not worry! The coconut collar means it does not matter if your icing isn’t smooth.

snowball cake recipe gluten free

What Did You Use For the Snowballs?

I used the Schär CoCos, which worked perfectly. If you can’t get hold of them, you could have fun creating a festive scene instead or use some cake toppers. I also gave it a spritz of edible glitter (which you can buy in most supermarkets), to give it a lovely shimmer.

Gluten Free Snowball Cake Recipe

This delicious gluten free snowball cake will serve about 10-12 people, depending how large you cut the slices. If you have any leftover cake, wrap in clingfilm and freeze on the day. Then defrost and enjoy as and when you fancy a slice.

Any questions while you are making it, please do message me on social media (@myglutenfreeguide) or email me at laura@mygfguide.com.

If you enjoy this gluten free snowball cake, please do leave a review on the recipe card below. It makes a world of difference to me :). And you can also share photos of your home creations in my Cooking Club on Facebook.

Enjoy! Laura xxx

Gluten Free Snowball Cake
Yield: Serves 10-12

Gluten Free Snowball Cake

Prep Time: 10 minutes
Cook Time: 25 minutes
Additional Time: 2 hours
Total Time: 2 hours 35 minutes

A showstopper that is the perfect alternative to traditional Christmas cake or a wonderful winter celebration cake. Layers of gluten free vanilla sponge, raspberry jam and white chocolate buttercream, finished with a coconut collar. Delicious!

Ingredients

For the vanilla sponge cake:

  • 6 large eggs
  • 390g unsalted butter (softened) or Stork baking spread
  • 390g caster sugar
  • 390 gluten free self raising flour
  • 2 tsp baking powder
  • 1 tsp xanthan gum
  • 2 tbsp milk
  • 1 tsp vanilla bean paste or vanilla extract

For the white chocolate buttercream:

  • 220g white cooking chocolate (use a good quality variety like Callebaut if possible)
  • 290g unsalted butter
  • 300g icing sugar (confectioners sugar)
  • 70ml double cream (heavy cream)
  • 1 tsp vanilla bean paste
  • Pinch of Maldon salt (sea salt flakes)

Others:

  • 6 tsp raspberry jam
  • 50-80g dessicated coconut (depending on how densely you coat the cake)
  • 10-12 Schar CoCos or other decoration for the top

Instructions

  1. First make the sponge cake. Line 3 20cm cake tins (base and sides) with non stick baking paper and preheat your oven to 180C (fan).
  2. Cream (mix) the butter and caster sugar together in a stand mixer bowl with paddle attachment for a couple of minutes (if you don't have a stand mixer, this can all be done by hand, you'll just need to work your arm muscles!), until pale and smooth.
  3. Incorporate the eggs, one at a time. then add the vanilla.
  4. Sift in the gluten free self raising flour, baking powder and xanthan gum. Gradually mix into the butter/sugar/vanilla/eggs, until you have a smooth and thick batter. Add the milk and mix again until smooth.
  5. Split the batter evenly between the 3 prepared cake tins, level the tops with an angled spatula and bake for 25-30 minutes (or until baked through, you can test the centre with a toothpick - if it comes out clean, it is baked, if it has liquid on it, give the cakes another 5 minutes).
  6. Once bake, carefully tip the sponges out of their tins, remove the baking paper and leave to cool completely.
  7. When cooled you can start on the buttercream. First melt the white chocolate in the microwave - I do this in 30 second blasts, stirring in between each, until it has just melted. Then set aside to cool (as if you add it to the buttercream while warm, it will soften the butter too much and make decorating tricky).
  8. Meanwhile, add the softened butter to a stand mixer with paddle attachment and mix for a few minutes. It should change from yellow block form to a paler, smooth consistency.
  9. Sift in the icing sugar and use a spoon to incorporate it, before adding the vanilla and beating again with the paddle attachment until smooth. Then pour in the COOLED white chocolate and mix for a minute until you have beautiful smooth and creamy buttercream.
  10. Finally add the double cream and pinch of sea salt and mix for a further 1 minute only. Then you are ready to start assembling the cake!
  11. Place a small dab of buttercream on the centre of your cake stand or serving plate, to secure the base sponge, then place the first sponge on top. Pipe or spoon about a 5th of the buttercream onto the sponge, piping a border about a cm in from the edge of the sponge to hold the jam.
  12. Spoon 3 tsp of jam onto the buttercream and spread to the inside edges of the piped buttercream circle, so you've a nice jammy pool. Then place a second sponge on top. Repeat with buttercream and jam, then add the final third sponge on top.
  13. Pipe the rest of the buttercream onto the top and sides of the cake, then use a palette knife or cake scraper to smooth it out into an even layer. The whole cake should be covered.
  14. Place a large plate or tray underneath your cake stand while you carefully press the dessicated coconut onto the sides (not the top) of the cake. The tray with catch any coconut that falls off, so you can scoop and reuse/not make a massive mess on your kitchen floor! Keep going until you have an even coating of coconut all around the sides of the cake.
  15. To finish, top with CoCos or the decorations of your choice. The serve immediately or refrigerate until needed (if chilling, take the cake our of the fridge an hour before serving).

Notes

You can make the sponges a day in advance if you want, simply allow to cool them wrap in cling film until you are ready to assemble. Alternatively, you can make the entire cake in advance and refridgerate for up to 24 hours before needed.

gluten free snowball cake

For more festive gluten free recipes, why not try one of these:

Enjoy! Laura xxx